When http://localhost:8080 isn't working, you may want to try starting the tomcat server.
I'm going to assume that Tomcat was installed at /Library/Tomcat/apache-tomcat-6.0.18/
cd /Library/Tomcat/apache-tomcat-6.0.18/bin
./startup.sh
p.s. During setup, make sure CATALINA_HOME points to /Library/Tomcat/apache-tomcat-6.0.18. If it is not, edit your .profile file and redirect the CATALINA_HOME environment variable.
iPhone: Localization
Should have done my research before trying to do my own localization on the phone... the full article can be found here. Here are the basic steps to localizing your iphone application. Trust me, this is the way to do it...
Step 1: Create 2 directories called en.lproj (English) and it.lproj (Italian)
Step 2: Add new string file by going to File -> New File -> Other -> Strings File, name the file as "Localizable.strings" and place it in en.lproj.
Step 3: Repeat step 2, this time saving "Localizable.strings" inside it.lproj.
Step 4: Add the following lines to the strings files...
Step 5: To grab WelcomeKey you just do: NSLocalizedString(@"WelcomeKey", @"") like so:
That's all there is to it... Here are some of Apple's conventional language codes:
English: en
Japanese: ja
French: fr
Deutsch: de
Netherlands: nl
Italian: it
Spanish: es
Portugues: pt
Korean: ko
Simplified Chinese: zh-Hans
Traditional Chinese: zh-Hant
The full list can be accessed through the following call:
Step 1: Create 2 directories called en.lproj (English) and it.lproj (Italian)
Step 2: Add new string file by going to File -> New File -> Other -> Strings File, name the file as "Localizable.strings" and place it in en.lproj.
Step 3: Repeat step 2, this time saving "Localizable.strings" inside it.lproj.
Step 4: Add the following lines to the strings files...
"WelcomeKey" = "Welcome!!!"; // put into english version
"WelcomeKey" = "Benvenuto!!!";
// put into italian versionStep 5: To grab WelcomeKey you just do: NSLocalizedString(@"WelcomeKey", @"") like so:
NSLog(@"Welcome Text: %@", NSLocalizedString(@"WelcomeKey", @""));
That's all there is to it... Here are some of Apple's conventional language codes:
English: en
Japanese: ja
French: fr
Deutsch: de
Netherlands: nl
Italian: it
Spanish: es
Portugues: pt
Korean: ko
Simplified Chinese: zh-Hans
Traditional Chinese: zh-Hant
The full list can be accessed through the following call:
NSArray *languages = [defaults objectForKey:@"AppleLanguages"];
// print each NSString in languages
PostgreSQL: Advanced PostgreSQL
Transactions:
begin work;
// do query
commit work;
begin work;
// do query
rollback work; // undo
begin work;
SET TRANSACTION ISOLATION LEVEL SERIALIZABLE; // serialize, data doesn't change
// do query
commit work;
begin work;
// do query. End with FOR UPDATE; this serializes & locks this transaction until I update or transaction ends
// do update
commit work;
INDEX: Speeds up searches
create index [indexname] on [tbl] ( [col1], [col2] );
drop index [indexname];
create unique index [indexname] on [tbl] ( [col1], [col2] );
CLUSTER: Speeds up searches by clustering large search results
VACUUM: Speeds up searches by cleaning up expired rows
vacuum [tbl];
vacuum analyze [tbl];
EXPLAIN: Shows speed & statistic on queries
explain select * from [tbl];
LIMIT:
select * from [tbl] limit #;
select * from [tbl] limit # offset #;
CURSOR: must take place inside a transaction
begin work;
declare [cursor name] cursor for select [col] from [tbl];
fetch # from [cursor name];
move #from [cursor name];
close [cursor name];
commit work;
Temporary tables
select * into temporary [tbl] from [tbl2] where [condition];
Alter table content:
alter table [tbl] rename to [tbl'];
alter table [tbl] rename column [col] to [col'];
alter table [tbl] add column [col] [type];
alter table [tbl] alter column [col] [type];
alter table [tbl] alter column [col] set default [value];
alter table [tbl] alter column [col] drop default;
Grant permission:
grant select on [tbl] to [user];
grant all on [tbl] to public;
Inheritance:
create table [tbl] ( ... );
create table [tb2] ( ... ) inherits ( [tbl1] );
select * from [tbl1]*; // access shared columns in tbl1 & tbl2
Views: Views cannot be directly modified, just queried
create view [viewname] as [select ...];
drop view [viewname];
Rules:
create rule [rulename] as on select to [tbl/view] do instead nothing;
create rule [rulename] as on insert to [tbl/view] do instead [what to do];
create rule [rulename] as on update to [tbl/view] do instead [what to do];
create rule [rulename] as on deleete to [tbl/view] do instead [what to do];
Constraints: NOT NULL, UNIQUE, PRIMARY KEY
create table [tbl] ( col1 INTEGER NOT NULL DEFAULT [value] );
create table [tbl] ( col1 INTEGER UNIQUE );
create table [tbl] ( col1 INTEGER PRIMARY KEY ); // UNIQUE+NOT NULL
create table [tbl] (
col1 INTEGER,
col2 INTEGER,
UNIQUE(col1, col2) // must be on its own line
);
create table [tbl] (
col1 INTEGER,
col2 INTEGER,
PRIMARY KEY(col1, col2) // must be on its own line
);
Foreign Key:
create table [tbl1] ( col INTEGER PRIMARY KEY );
create table [tbl2] ( col INTEGER REFERENCES [tbl1] );
Foreign Key Options:
create table [tbl2] ( col INTEGER REFERENCES [tbl1] on update CASCADE on delete SET NULL );
where:
NO ACTION = UPDATEs and DELETEs to the primary key are prohibited if referenced by a foreign key row. (Default)
CASCADE = UPDATEs to the primary key update all foreign key columns that reference it. DELETEs on the primary key cause the deletion of all foreign key rows that reference it.
SET NULL = UPDATEs and DELETEs to the primary key row cause the foreign key to be set to NULL.
CHECK: validity checking during insertion
create table [tbl] ( age INTEGER CHECK (age > 18) );
create table [tbl] ( gender CHAR(1) CHECK (gender IN ('M', 'F') );
create table [tbl] ( age INTEGER, gender CHAR(1), CHECK ( age > 18 and gender in ('M', 'F') ) );
begin work;
// do query
commit work;
begin work;
// do query
rollback work; // undo
begin work;
SET TRANSACTION ISOLATION LEVEL SERIALIZABLE; // serialize, data doesn't change
// do query
commit work;
begin work;
// do query. End with FOR UPDATE; this serializes & locks this transaction until I update or transaction ends
// do update
commit work;
INDEX: Speeds up searches
create index [indexname] on [tbl] ( [col1], [col2] );
drop index [indexname];
create unique index [indexname] on [tbl] ( [col1], [col2] );
CLUSTER: Speeds up searches by clustering large search results
VACUUM: Speeds up searches by cleaning up expired rows
vacuum [tbl];
vacuum analyze [tbl];
EXPLAIN: Shows speed & statistic on queries
explain select * from [tbl];
LIMIT:
select * from [tbl] limit #;
select * from [tbl] limit # offset #;
CURSOR: must take place inside a transaction
begin work;
declare [cursor name] cursor for select [col] from [tbl];
fetch # from [cursor name];
move #from [cursor name];
close [cursor name];
commit work;
Temporary tables
select * into temporary [tbl] from [tbl2] where [condition];
Alter table content:
alter table [tbl] rename to [tbl'];
alter table [tbl] rename column [col] to [col'];
alter table [tbl] add column [col] [type];
alter table [tbl] alter column [col] [type];
alter table [tbl] alter column [col] set default [value];
alter table [tbl] alter column [col] drop default;
Grant permission:
grant select on [tbl] to [user];
grant all on [tbl] to public;
Inheritance:
create table [tbl] ( ... );
create table [tb2] ( ... ) inherits ( [tbl1] );
select * from [tbl1]*; // access shared columns in tbl1 & tbl2
Views: Views cannot be directly modified, just queried
create view [viewname] as [select ...];
drop view [viewname];
Rules:
create rule [rulename] as on select to [tbl/view] do instead nothing;
create rule [rulename] as on insert to [tbl/view] do instead [what to do];
create rule [rulename] as on update to [tbl/view] do instead [what to do];
create rule [rulename] as on deleete to [tbl/view] do instead [what to do];
Constraints: NOT NULL, UNIQUE, PRIMARY KEY
create table [tbl] ( col1 INTEGER NOT NULL DEFAULT [value] );
create table [tbl] ( col1 INTEGER UNIQUE );
create table [tbl] ( col1 INTEGER PRIMARY KEY ); // UNIQUE+NOT NULL
create table [tbl] (
col1 INTEGER,
col2 INTEGER,
UNIQUE(col1, col2) // must be on its own line
);
create table [tbl] (
col1 INTEGER,
col2 INTEGER,
PRIMARY KEY(col1, col2) // must be on its own line
);
Foreign Key:
create table [tbl1] ( col INTEGER PRIMARY KEY );
create table [tbl2] ( col INTEGER REFERENCES [tbl1] );
Foreign Key Options:
create table [tbl2] ( col INTEGER REFERENCES [tbl1] on update CASCADE on delete SET NULL );
where:
NO ACTION = UPDATEs and DELETEs to the primary key are prohibited if referenced by a foreign key row. (Default)
CASCADE = UPDATEs to the primary key update all foreign key columns that reference it. DELETEs on the primary key cause the deletion of all foreign key rows that reference it.
SET NULL = UPDATEs and DELETEs to the primary key row cause the foreign key to be set to NULL.
CHECK: validity checking during insertion
create table [tbl] ( age INTEGER CHECK (age > 18) );
create table [tbl] ( gender CHAR(1) CHECK (gender IN ('M', 'F') );
create table [tbl] ( age INTEGER, gender CHAR(1), CHECK ( age > 18 and gender in ('M', 'F') ) );
PostgreSQL: Data Types, Functions
display all data types: \dT
Data Types: (Page 108)
TEXT, VARCHAR(length), CHAR(length)
INTEGER, INT2, INT8, OID, NUMERIC(precision, decimal), FLOAT, FLOAT4
DATE, TIME, TIMESTAMP, INTERVAL
BOOLEAN
POINT, LSEG, PATH, BOX, CIRCLE, POLYGON
INET, CIDR, MACADDR
Array Example:
create table [tbl] ( col INTEGER[5] );
insert into [tbl] values ( '{1, 2, 3, 4, 5}' );
Functions: (Page 113)
length(), character_length(), trim(), upper(), lower(), substr(), to_number()
round(), trunc(), abs(), factorial(), sqrt(), cbrt(), exp(), ln(), log(), to_char()
date_part(), now(), timeofday()
Variables:
CURRENT_DATE
CURRENT_TIME
CURRENT_TIMESTAMP
CURRENT_USER
Casts:
CAST('5/8/1982' AS DATE)
CAST('5/8/1982' AS TIMESTAMP)
SVN: Troubleshooting
Rule: DO NOT EVER EDIT SVN DB FILES DIRECTLY!
The problem: Wanted to fix the log message for a specific revision.
My (bad) solution: Edit db/revprops/### directly.
This causes the following error:
svn: General svn error from server
To fix this, copy another ### file and overwrite the bad one you altered. After that you should be back in business, just with a bad log.
Now to change the log the PROPER way, go on the server computer and type:
echo "my message goes here" >> msg
svnadmin setlog /Path/to/repo -r #REV# msg
PostgreSQL: Intermediate PostgreSQL
Aggregates:
Return # of rows: COUNT(*)
Return count of NON-NULL values in a column: COUNT(colname)
SUM(colname)
MAX(colname)
MIN(colname)
AVG(colname)
Grouping aggregates: GROUP BY
select [col], aggregate#1, aggregate#2 from [tbl] group by [col], [aggregate#1];
Aggregate conditionals: HAVING
select [col], aggregate#1 from [tbl] group by [col] having [aggregate condition];
Alias:
select [col] from [tbl] [alias] where [alias].[col?] = [condition];
select [col] from [tbl] [alias1], [tbl] [alias2] where [condition];
Joining:
select [tbl].[col] from [tbl1], [tbl2] where [tbl1].[col] = [tb2].[col];
Distinct: Return distinct col1+col2 pairs only
select distinct [col1], [col2], count(*) from [tbl] where [condition];
Unjoined table: Cartesian product
select * from [tbl1], [tb2];
Nonequijoin: (Could be any of <, <>, !=, >)
select [col] from [tbl] [alias1], [tbl] [alias2] where [alias1].[col1] <> [alias2].[col2];
OIDs: Automatically incremented & always distinct
select oid, [col] from [tbl];
create table [tbl] ( customer_oid OID );
AUTO-Numbering / Sequences:
create sequence [sequence name];
create table [tbl] ( customer_id INTEGER DEFAULT nextval('[sequence name]') );
insert into [tbl] values ( nextval('[sequence name]') );
currval('[sequence name]');
setval('[sequence name]', #);
create table [tbl] ( customer_id SERIAL ); // alternative
UNION: Combined results, A and B
select [col1] from [tbl1] union select [col2] from [tbl2];
select [col1] from [tbl1] union all select [col2] from [tbl2]; // with duplicates
EXCEPT: A but not in B
select [col1] from [tbl1] except select [col2] from [tbl2];
INTERSECT: A and in B
select [col1] from [tbl1] intersect select [col2] from [tbl2];
SUBQUERIES: Select within a select, bypass joins
select [col2] from [tbl2] where [col2] <> ( select [col1] from [tbl1] where [condition] );
SUBQUERIES W/ LISTS: Using IN/NOT IN/ANY/ALL/EXISTS/NOT EXISTS
select [col2] from [tbl2] where [col2] in ( select [col1] from [tbl1] where [condition] );
select [col2] from [tbl2] where [col2] not in ( select [col1] from [tbl1] where [condition] );
select [col2] from [tbl2] where [col2] any ( select [col1] from [tbl1] where [condition] );
select [col2] from [tbl2] where [col2] all ( select [col1] from [tbl1] where [condition] );
select [col2] from [tbl2] where [col2] exists ( select [col1] from [tbl1] where [condition] );
select [col2] from [tbl2] where [col2] not exists ( select [col1] from [tbl1] where [condition] );
UPDATE + FROM:
update [tbl1] set [col]=[val] from [tbl2] where [condition w/ tbl1 + tbl2];
INSERT USING SELECTS: transfer data from table 1 to 2
insert into [tbl1] (name) select 'danny' from [tbl2];
SELECT INTO: copy table 1 to 2
select [col1], [col2] into [tbl2] from [tbl1];
Text concatenation: ||
'Danny' || 'Cool' = 'DannyCool'
PostgreSQL: Regular Expression Query
Taken from PostgreSQL Introduction & Concepts
regular expression: ~
regular expression (case-insensitive): ~*
not equal to regular expression: !~
not equal to regular expression (case-insensitive): !~*
Basic Rules:
start: ^
end: $
any single character: .
set of characters: [abc]
set of characters not equal: [^abc]
range of characters: [a-z]
range of characters not equal: [^a-z]
zero or 1: ?
zero or more: *
one or more: +
OR: |
Examples:
begins with D: ~ '^D'
contains D: ~ 'D'
D in second position: ~ '^.D'
begins with D and contains e: ~ 'D.*e'
begins with D, contains e, then f: ~ '^D.*e.*f'
contains A, B, C, or D: ~ '[A-D]' or ~ '[ABCD]'
contains A or a: ~ * 'a' or ~ '[Aa]'
does not contain D: !~ 'D'
does not begin with D: !~ '^D' or ~ '^[^D]'
begin with D, one optional space in front: ~ '^ ?D'
begin with D, with optional leading spaces: ~ '^ *D'
begin with D, with at least 1 space: ~ '^ +D'
end with G, with optional trailing spaces: ~ 'G *$'
PostgreSQL: Basic PostgreSQL & SQL
After years of messing with MySQL, I am finally getting into PostgreSQL. The transition was not as easy as I had hoped.
To enter a database:
psql [dbname] -U [username]
Get list of SQL commands: \h
Get help: \?
To exit a database: \q
To clear the buffer: \r
To print the current query: \p
List all tables: \d
Expanded display (instead of columns): \x
List all functions: \df
List all functions named X: \df [function name]
Describe a function: \dd [function name]
Describe an operator: \do [operator ie. ! ^ * + -]
Commentting:
-- a single line comment
/* */ multi-line comment
Create new user:
create user [username] with password '[password]' [createdb/nocreatedb] in group [groupname] valid until 'Jan 1 2005';
Create database:
create database [dbname] with owner [1], [2] encoding = 'UTF8';
Common data types:
CHAR(length), VARCHAR(length)
INTEGER, FLOAT, NUMERIC(precision/decimal)
DATE, TIME, TIMESTAMP
Create table:
create table [tblname] (firstname CHAR(15), lastname CHAR(20), age INTEGER);
create table [tblname] (firstname CHAR(15) default 'no name');
Delete table:
drop table [tblname];
Describe specific table:
\d [tblname];
Insert table content:
insert into [tblname] values ('firstname', 'lastname', 20);
Delete table content:
delete from [tblname]; (deletes all)
delete from [tblname] where [condition];
Update table content:
update [tblname] set [colname]=[new value] where [condition];
Display table content:
select * from [tblname] where age<=20; select * from [tblname] where age>=18 and firstname='danny';
Display table content w/ specified column name:
select [colname] as [tmp-alt colname] from [tblname] order by [tmp-alt colname];
select 1+3 as total;
Display table content w/ specific ordering:
select * from [tblname] where [condition] order by [col1] DESC, [col2], [col3] DESC;
Conditional query:
select [colname] case when [condition w/ colname] then [conditional string value for yes] else [conditional string value for no] end as [casename] from [tblname];
select [colname] case when [condition 1 w/ colname] then [case string value 1 for yes] when [condition 2 w/ colname] then [case string value 2 for yes] else [string value for no] end as [casename] from [tblname];
Grabbing distinct column values from table:
select distinct [colname] from [tblname];
select distinct [col1], [col2] from [tblname];
Example Conditions:
age <> 99
age IS NULL
age != 22 and (firstname='jack' or firstname='bob')
age between 33 and 35
Like Conditions:
like 'D%' (begins with D)
like '%D%' (contains a D)
like '_D%' (has D in second position)
like 'D_nny' (Donny, Danny, Denny)
like 'D%e%' (begins with D contains e)
like 'D%e%f%' (begins with D contains e, then f)
not like 'D%' (begins with non-D)
Common vars:
select current_user;
select current_timestamp;
PostgreSQL: Setting up PostgreSQL in Mac OSX
NOTE: Do NOT mix the 2 methods. Once you install using the dmg, you will lose access to the server data. However you will gain the use of pgAdmin, which is very similar to SQLServer (from what I remember anyway...).
One method is to download the .dmg from their website, which automatically sets up everything for you, including database URL, port, username & password.
The other method is to do this yourself via command-line:
1. mkdir /DB/data
2. chmod 0700 /DB/data
3. initdb -D /DB/data
4. pg_ctl start -D /DB/data
5. pg_ctl stop -D /DB/data
You can use a simple shell script to start/stop/restart the server for you (taken from Will Green)
#!/bin/bash
export PGDATA=/DB/data
start() {
echo -n "Starting Postgres: "
pg_ctl start -l $PGDATA/postgres.log
return
}
stop() {
echo -n "Shutting down Postgres: "
pg_ctl stop -l $PGDATA/postgres.log
return
}
case "$1" in
start)
start
;;
stop)
stop
;;
restart)
stop
start
;;
*)
echo "Usage: {start|stop|restart}"
exit 1
;;
esac
exit $?
SVN: Setting up SVN w/ Apache
First of all, I should mention there are typically 2 ways to access SVN:
1. http://url.com
2. svn://url.com
The following steps helps you set up the directory access for method 1. Accessing through http protocol.
Step 1. Install Apache
Step 2. Install Subversion
Step 3. Set environment path=subversion/bin
Step 4. Edit Apache httpd.conf (module section). Add the following lines:
LoadModule dav_module modules/mod_dav.so
LoadModule dav_svn_module modules/mod_dav_svn.so
LoadModule authz_svn_module modules/mod_authz_svn.so
Step 5. Copy the modules from Subversion/bin into Apache/modules
Step 6. Add new VirtualHost entry:
< VirtualHost ip:port>
ServerAdmin webmaster@url.com
DocumentRoot c:/wwwroot
ServerName svn.url.com
LogLevel warn
ErrorLog logs/svn.url.com.error.log
CustomLog logs/svn.url.com.access.log common
< Location>
DAV svn
SVNParentPath c:/svnroot
SVNListParentPath on
AuthzSVNAccessFile c:/svnrepo/conf/authz
AuthType Basic
AuthName "Kronos SVN"
AuthUserFile c:/svnrepo/conf/htpasswd
Require valid-user
< /Location>
< /VirtualHost>
Step 7. Customize authz file
[groups]
admin = bob, joe, mike
visitor = dan, steve, matt
[reponame:/]
* =
@admin = rw
@visitor = r
[reponame:/subdir/]
* =
@admin = rw
@visitor =
Step 8. Customize htpasswd file
use apache/bin/htpasswd.exe to create htpasswd file: htpasswd.exe -c /path/htpasswd user1
add aditional users to htpasswd file: htpasswd.exe /path/htpasswd user2
Step 9. Restart your apache server
To set up directory access for method 2, accessing through svn port directly is much simpler, but does not offer the encrypted password protection offered in method 1. The trick is, you can actually have BOTH.
For the admin account I like to use the http access w/ encrypted protection. For additional accounts, just to make things simpler, I use the svn passwd file which typically just looks like this:
[users]
user1=password1
user2=password2
Just make sure you adjust the svn configuration file accordingly & you should be all set. Restart your svn server after changing the configuration file.
SVN: Configure Authorizations
Disallow anonymous access:
anon-access=none
auth-access=write
Allow anonymouse access:
anon-access=read
auth-access=write
anon-access=none
auth-access=write
Allow anonymouse access:
anon-access=read
auth-access=write
OS X: Default Program for Extensions
Say I wanted to open all avi with VLC instead of default QuickTime, this is how to change it in OS X...
Step 1: Ctrl+I on any .avi file
Step 2: Under "Open With...", select the appropriate program to open this extension with
Step 3: Press "Change All"
Step 1: Ctrl+I on any .avi file
Step 2: Under "Open With...", select the appropriate program to open this extension with
Step 3: Press "Change All"
SVN: Recursive Svn Ignore
The easiest way to do this is by creating a global svn ignore file that you wish to copy recursively into all sub-directories.
Step 1: Create global.svn.ignore file. Type "emacs global.svn.ignore"
Step 2: Type files/directories to ignore, each on its own line (ie. *.txt, build)
Step 3: Close emacs by entering Ctrl+x, Ctrl+c, y (for yes)
Step 4: Type "svn propset -R svn:ignore -F global.svn.ignore ."
When complete the command prompt should read:
property 'svn:ignore' set (recursively) on '.'
SVN: Simple Svn Ignore
To svn:ignore on one single directory:
Step 1: In console, type "svn propedit svn:ignore ."
Step 2: This will open emacs & blank document.
Step 3: In emacs, type file/directory to ignore, each separated by a newline (ie. *.txt, build)
Step 4: Close emacs by entering Ctrl+x, Ctrl+c, y (for yes)
Step 1: In console, type "svn propedit svn:ignore ."
Step 2: This will open emacs & blank document.
Step 3: In emacs, type file/directory to ignore, each separated by a newline (ie. *.txt, build)
Step 4: Close emacs by entering Ctrl+x, Ctrl+c, y (for yes)
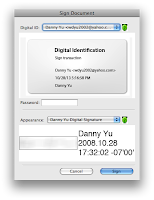
ACROBAT: Graphical Digital Signatures
Step 1: Create an image of your signature as a PNG
Step 2: Create a signature pdf (File > Create PDF > From Blank Page)
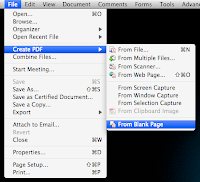
Step 3: Paste the signature image onto new pdf
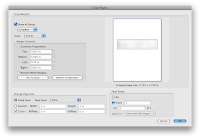
Step 4: Crop the page so the signature dimensions are as small as necessary (Documents > Crop Pages...)

Step 5: Manipulate the Margin Controls fields to control crop size
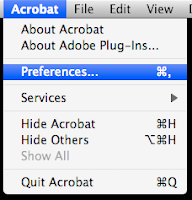
Step 6: Create a signature template (Acrobat > Preferences...)
Step 7: Select Security on the left, and create new signature by clicking on New...

Step 8: Configure Signature Appearance, select Imported Graphic, click on File...
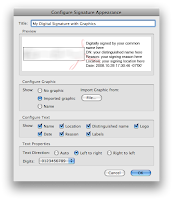
Step 9: Now you can insert the signature by selecting Appearance
Step 2: Create a signature pdf (File > Create PDF > From Blank Page)

Step 3: Paste the signature image onto new pdf
Step 4: Crop the page so the signature dimensions are as small as necessary (Documents > Crop Pages...)

Step 5: Manipulate the Margin Controls fields to control crop size

Step 6: Create a signature template (Acrobat > Preferences...)

Step 7: Select Security on the left, and create new signature by clicking on New...

Step 8: Configure Signature Appearance, select Imported Graphic, click on File...

Step 9: Now you can insert the signature by selecting Appearance

IPHONE: XIB Overlay over openGL
This is an example of overlaying an XIB on top of the Apple openGL template project.
Step 1: Create new OpenGL Template

Step 2: Create new files (Cocoa Touch Classes > UIViewController subclass)

Step 3: Create new xib (User Interfaces > View XIB)

Step 4: Customize the xib however you like

Step 5: Link xib to class (select File's Owner -> Apple+Shift+I. Under 'i' tab, type Class = subclass name)

Step 6: Make view bg transparent (select View -> Apple+Shift+I. Under > Settings > View > Background > set opacity to 0%)


Step 7: Right-click & drag from File's Owner to View

Step 8: Select view

Step 9: In AppDelegate header, alter as follows

Step 10: In AppDelegate class, alter applicationDidFinishLaunching method

Step 11: Run the application.

IPHONE: Unable to locate a suitable developer disk image
PROBLEM:
When attempting to open Xcode with the iPod Touch plugged in (running OS 2.1.1), user receives error: "Unable to locate a suitable developer disk image"
SOLUTION:
cd /Developer/Platforms/iPhoneOS.platform/DeviceSupport
ln -s 2.1/ 2.1.1
When attempting to open Xcode with the iPod Touch plugged in (running OS 2.1.1), user receives error: "Unable to locate a suitable developer disk image"
SOLUTION:
cd /Developer/Platforms/iPhoneOS.platform/DeviceSupport
ln -s 2.1/ 2.1.1
IPHONE: Setting up certificates
Even though this is explained in detail on the Programmers Portal... sometimes it's just better with a second tutorial.
Step 1: Create certificate using Keychain Access


Step 2: Upload certificate for authentication
Step 3: Download the issued certificate
Step 4: Drag drop the certificate into Keychain Access > Certificates

Step 1: Create certificate using Keychain Access


Step 2: Upload certificate for authentication
Step 3: Download the issued certificate
Step 4: Drag drop the certificate into Keychain Access > Certificates

JAVA: NIO Socket Implementation (SERVER)
ServerSocketChannel socket = ServerSocketChannel.open();
socket.configureBlocking(false);
socket.socket().bind(new InetSocketAdress("127.0.0.1", 8000);
selector = Selector.open();
socket.register(selector, SelectionKey.OP_ACCEPT);
while(true) {
if(selector.select()==0) continue;
Set setKeys = selector.selectedKeys();
Iterator iteratedKeys = setKeys.iterator();
while(key.hasNext()) {
SelectionKey key = (SelectionKey) key.next();
keys.remove();
// accept connection
if(key.isAcceptible()) {
// get SocketChannel from key
SocketChannel channel = server.accept();
channel.configureBlocking(false);
// enable read write to channel
channel.register(selector, SelectionKey.OP_READ |
SelectionKey.OP_WRITE);
}
// accept readable package
if(key.isReadable()) {
// get SocketChannel from key
SocketChannel channel = (SocketChannel)
key.channel();
if(channel.isConnectionPending())
channel.finishConnect();
int read = 0;
Charset charset =
Charset.forName("ISO-8859-1");
CharsetDecoder decoder = charset.newDecoder();
CharBuffer charbuffer = null;
ByteBuffer buffer = ByteBuffer.allocate(1024);
ByteArrayOutputStream stream =
new ByteArrayOutputStream();
while((read = target.read(buffer)) > 0) {
stream.write(buffer.array(), 0, read);
buffer.clear();
}
charbuffer = decoder.decode(
ByteBuffer.wrap(stream.toByteArray()));
stream.close();
return charbuffer;
}
// write to channel
if(key.isWriteable()) {
// get SocketChannel from key
SocketChannel channel =
(SocketChannel) key.channel();
channel.write(ByteBuffer.wrap(
new String("hello from server").getBytes()));
}
}
}
socket.configureBlocking(false);
socket.socket().bind(new InetSocketAdress("127.0.0.1", 8000);
selector = Selector.open();
socket.register(selector, SelectionKey.OP_ACCEPT);
while(true) {
if(selector.select()==0) continue;
Set
Iterator
while(key.hasNext()) {
SelectionKey key = (SelectionKey) key.next();
keys.remove();
// accept connection
if(key.isAcceptible()) {
// get SocketChannel from key
SocketChannel channel = server.accept();
channel.configureBlocking(false);
// enable read write to channel
channel.register(selector, SelectionKey.OP_READ |
SelectionKey.OP_WRITE);
}
// accept readable package
if(key.isReadable()) {
// get SocketChannel from key
SocketChannel channel = (SocketChannel)
key.channel();
if(channel.isConnectionPending())
channel.finishConnect();
int read = 0;
Charset charset =
Charset.forName("ISO-8859-1");
CharsetDecoder decoder = charset.newDecoder();
CharBuffer charbuffer = null;
ByteBuffer buffer = ByteBuffer.allocate(1024);
ByteArrayOutputStream stream =
new ByteArrayOutputStream();
while((read = target.read(buffer)) > 0) {
stream.write(buffer.array(), 0, read);
buffer.clear();
}
charbuffer = decoder.decode(
ByteBuffer.wrap(stream.toByteArray()));
stream.close();
return charbuffer;
}
// write to channel
if(key.isWriteable()) {
// get SocketChannel from key
SocketChannel channel =
(SocketChannel) key.channel();
channel.write(ByteBuffer.wrap(
new String("hello from server").getBytes()));
}
}
}
IPHONE: Http POST request
Execute a POST request
// target URL
CFURLRef URL = CFURLCreateWithString(
kCFAllocatorDefault,
CFSTR("http://www.apple.com"),
NULL);
// request type
CFStringRef requestMethod =
CFSTR("POST");
// setup request
CFHTTPMessageRef myRequest =
CFHTTPMessageCreateRequest(
kCFAllocatorDefault,
requestMethod,
URL,
kCFHTTPVersion1_1);
// body
CFStringRef bodyString =
CFSTR("[[post content value-pairs]]");
// set body in msg
CFHTTPMessageSetBody(
myRequest,
CFStringCreateExternalRepresentation(
NULL,
bodyString,
kCFStringEncodingMacRoman,
'?'));
// header
CFHTTPMessageSetHeaderFieldValue(
myRequest,
CFSTR("Content-Length"),
(CFStringRef) [NSString stringWithFormat: @"%d",
CFStringGetLength(bodyString)]);
// header property #1
CFHTTPMessageSetHeaderFieldValue(
myRequest,
CFSTR("Host"),
CFSTR("www.apple.com"));
// header property #2
CFHTTPMessageSetHeaderFieldValue(
myRequest,
CFSTR("Content-Type"),
CFSTR("application/x-www-form-urlencoded"));
// POST it
CFReadStreamRef myReadStream =
CFReadStreamCreateForHTTPRequest(
kCFAllocatorDefault,
myRequest);
CFStreamClientContext myContext =
{ 0, (void*)NULL, NULL, NULL, NULL };
CFReadStreamSetProperty(
myReadStream,
kCFStreamPropertyHTTPAttemptPersistentConnection,
kCFBooleanTrue);
CFReadStreamSetClient(
myReadStream,
kCFStreamEventHasBytesAvailable |
kCFStreamEventErrorOccurred |
kCFStreamEventEndEncountered,
ReadStreamClientCallBack,
&myContext);
CFReadStreamScheduleWithRunLoop(
myReadStream,
CFRunLoopGetCurrent(),
kCFRunLoopCommonModes);
CFReadStreamOpen(myReadStream);
CFRelease(myRequest);
CFRelease(URL);
Access the message returned
// debug print message
CFDataRef msgFromRequest =
CFHTTPMessageCopySerializedMessage(myRequest);
// length of msg
int msgLength =
CFDataGetLength(msgFromRequest);
// buffer to hold data
Byte* buffer =
(Byte*) malloc (sizeof(Byte) * msgLength);
// grab data place into buffer
CFDataGetBytes(msgFromRequest, CFRangeMake(0, msgLength), buffer);
// clean up
CFRelease(msgFromRequest);
free(buffer);
XCODE: Change Executable Name
1. Right click on Targets click on General Tab
2. Change the Name to desired Executable Name
2. Change the Name to desired Executable Name
SVN: Commands (Continued)
SVN command-line commands
SVN IGNORE
1. Navigate to the parent directory that you wish to edit
2. Type "svn propedit svn:ignore ."
3. In EMACS (default) type the directory/file name, ie.
build
*.txt
text_*.txt
SVN STATUS
1. Allows you to see the diff between local & server
SVN SWITCH
1. Allow you to switch the root directory repository location
2. Type "svn switch --relocate svn://1.2.3.4 svn://5.6.7.8"
SVN CHECKOUT
svn co [src url] [dest dir]
ie. svn co http://svn.collab.net/repos/svn/trunk svn
SVN: Authorization Failed
- You probably need to restart your SVN service
- You probably need to restart your Apache service
OBJ-C: Primitive Array Length
// this accurately obtains the size
int INTS[] = {1, 2, 3, 4, 5};
int length = sizeof INTS / sizeof INTS[0];
RESULT => length = 4
// this fails. returns the size of the pointer (4 bytes)
int* INTS_PTR = &INTS[0];
int length = sizeof INTS / sizeof INTS[0];
RESULT => length = 1
int INTS[] = {1, 2, 3, 4, 5};
int length = sizeof INTS / sizeof INTS[0];
RESULT => length = 4
// this fails. returns the size of the pointer (4 bytes)
int* INTS_PTR = &INTS[0];
int length = sizeof INTS / sizeof INTS[0];
RESULT => length = 1
OBJ-C: Printing with NSString
// Printing a single NSString
NSString* string = @"hello world!";
printf("%s", [string UTF8String]);
printf("%s", [string cString]);
// Printing from an array of NSString
NSString* strings[3] = {@"1st string", @"2nd string", @"3rd string"};
for(int i=0; i<3; i++) {
printf("%s", [strings[i] cString]);
}
NSString* string = @"hello world!";
printf("%s", [string UTF8String]);
printf("%s", [string cString]);
// Printing from an array of NSString
NSString* strings[3] = {@"1st string", @"2nd string", @"3rd string"};
for(int i=0; i<3; i++) {
printf("%s", [strings[i] cString]);
}
OBJ-C: Properties
// if we want to use auto-synthesize
@interface ClassName : NSObject
{
@private
int variableName;
}
@property (nonatomic) int variableName;
@end
@implementation ClassName
@synthesize variableName;
@end
// if we want to manually make accessors
@interface ClassName : NSObject
{
@private
int variableName;
}
@property (nonatomic) int variableName;
- (int) variableName;
- (void) setVariableName : (int) param;
@end
@implementation ClassName
@dynamic variableName;
- (int) variableName
{
return variableName;
}
- (void) setVariableName : (int) param
{
variableName = param;
}
@end
NOTE:
This allows the user to use
1. instance.variableName = x;
2. x = instance.variableName;
Which is normally NOT allowed because variableName was declared private
instance->variableName is only allowed if
1. instance is a pointer
2. variableName was declared public (does not go through accessors)
In either case, users can use the methods directly due to @synthesize
1. [instance setVariableName:x];
2. x = [instance variableName];
@interface ClassName : NSObject
{
@private
int variableName;
}
@property (nonatomic) int variableName;
@end
@implementation ClassName
@synthesize variableName;
@end
// if we want to manually make accessors
@interface ClassName : NSObject
{
@private
int variableName;
}
@property (nonatomic) int variableName;
- (int) variableName;
- (void) setVariableName : (int) param;
@end
@implementation ClassName
@dynamic variableName;
- (int) variableName
{
return variableName;
}
- (void) setVariableName : (int) param
{
variableName = param;
}
@end
NOTE:
This allows the user to use
1. instance.variableName = x;
2. x = instance.variableName;
Which is normally NOT allowed because variableName was declared private
instance->variableName is only allowed if
1. instance is a pointer
2. variableName was declared public (does not go through accessors)
In either case, users can use the methods directly due to @synthesize
1. [instance setVariableName:x];
2. x = [instance variableName];
JAVA: Clones
Java cloning will return a shallow copy of the current object.
Vector<Object> objs1 = new Vector<Object>();
objs1.add(new Object());
Vector<Object> objs2 = (Vector<Object>) objs1.clone();
System.out.println(objs1 == objs2); // return false
System.out.println(objs1.elementAt(0) == objs2.elementAt(0)); // return true
This means that clone() creates a totally separate instance of the original, uses up the same amount of space, but each of its Object children point to the same data as the original copy.
OBJ-C: Multi-variable parameters
- (id) foo : (id) firstElement, ...
{
// list place-holder
va_list elements;
id first = firstElement;
id next;
// where to start counting from
va_start(elements, firstElement);
do {
// grab next id
next = va_arg(elements, id);
// do something with next
} while (next != nil);
// end variable list
va_end(elements);
return nil;
}
{
// list place-holder
va_list elements;
id first = firstElement;
id next;
// where to start counting from
va_start(elements, firstElement);
do {
// grab next id
next = va_arg(elements, id);
// do something with next
} while (next != nil);
// end variable list
va_end(elements);
return nil;
}
J2ME: Force Transparency in MIDP2
grab each pixel color using getRGB
mask each pixel color with 0xFF00000
mask each pixel color with 0xFF00000
JAVA: How do StringBuffers work?
new StringBuffer(), creates a StringBuffer with capacity of 16 characters.
Java String concatentation operator (+) is implemented using the StringBuffer class
Given:
String a = "a";
String b = "b";
String c = "c";
The following produces the same results at run-time (speed, memory allocation).
a + b + c
new StringBuffer().append(a).append(b).append(c).toString();
When does it make sense to use StringBuffer?
String d = a + b;
d = d + c;
This now gets compiled into:
String d = new StringBuffer().append(a).append(b);
d = new StringBuffer().append(d).append(c);
This obviously is more costly/slower than:
String d = new StringBuffer().append(a).append(b);
d.append(c);
JAVA: What is the String Literal Pool?
class a { public static String a = "hello"; }
class b { public static String b = "hello"; }
class c {
public void static main(String args[]) {
System.out.println(A.a = B.b); // true
}
At compile-time:
Step 1: compile class a, tag "hello" as a special variable that can be loaded into the literal pool during run-time.
Step 2: compile class b, tag "hello" as a special variable that can be loaded into the literal pool during run-time.
At run-time in main:
Step 1: load String literal from class A ("hello") into literal pool
Step 2: attempt to load String literal from class B ("hello") into literal pool.
Step 3: "hello" already exists, return existing reference to "hello" in the literal pool
Tricking the Compilation for the String Literals
class c {
public void static main(String args[]) {
String a = "a";
String b = "b";
String c = "a" + "b";
String d = a + b;
System.out.println(c==d); // false, because a and b are variables subject to change
}
}
class d {
public void static main(String args[]) {
final String a = "a";
final String b = "b";
String c = "a" + "b";
String d = a + b;
System.out.println(c==d); // true, because a and b are constants!
}
}
class e {
public void static main(String args[]) {
String c = "a" + "b";
String d = "ab";
System.out.println(c==d); // true, because both RHS are constants!
}
}
String a = "hello";
String b = "hello";
final String c = new String ("hello");
String d = a.intern();
a == b // true
a == c // false
a == d // true
JAVA: Access getResourceAsStream() in static context
Typically, we are used to using:
SomeClassName obj = new SomeClassName();
stream = obj.getResourceAsStream();
Instead, we can access the method statically like so:
stream = SomeClassName.class.getResourceAsStream();
SomeClassName obj = new SomeClassName();
stream = obj.getResourceAsStream();
Instead, we can access the method statically like so:
stream = SomeClassName.class.getResourceAsStream();
JAVA: What is the Method Area?
Inside a Java virtual machine instance, information about loaded types is stored in a logical area of memory called the method area. When the Java virtual machine loads a type, it uses a class loader to locate the appropriate class file. The class loader reads in the class file--a linear stream of binary data--and passes it to the virtual machine. The virtual machine extracts information about the type from the binary data and stores the information in the method area. Memory for class (static) variables declared in the class is also taken from the method area.
ie. For each object loaded, there is a method table created.
ie. For each object loaded, there is a method table created.
SVN: Start SVN as Windows Service
Type into cmd:
sc create svn
binpath= "\"C:\Program Files\Subversion\bin\svnserve.exe\" --service -r \"C:\Program Files\Subversion\repos\""
displayname= "Subversion Server"
depend= Tcpip
start= auto
Should read: [sc] created successfully.
Now use IPCONFIG to find your IP, on a remote computer type: svn://ipaddress:3690
To delete a service:
sc delete, ie.
sc delete svn
Note:
In the sc create example, the service name is actually svn and NOT Subversion Server.
sc create svn
binpath= "\"C:\Program Files\Subversion\bin\svnserve.exe\" --service -r \"C:\Program Files\Subversion\repos\""
displayname= "Subversion Server"
depend= Tcpip
start= auto
Should read: [sc] created successfully.
Now use IPCONFIG to find your IP, on a remote computer type: svn://ipaddress:3690
To delete a service:
sc delete
sc delete svn
Note:
In the sc create example, the service name is actually svn and NOT Subversion Server.
XP: Windows Registry Hacks
1. Disabling Windows Desktop Search
A. Regedit > HKEY_CURRENT_USER\Software\Microsoft\Windows Desktop Search\DS
B. Set ShowStartSearchBand = 0
2. Search Including Files Without Extensions
A. Regedit > HKEY_LOCAL_MACHINE\SYSTEM\CurrentControlSet\Control\ContentIndex
B. Set FilterFilesWithUnknownExtensions = 1
A. Regedit > HKEY_CURRENT_USER\Software\Microsoft\Windows Desktop Search\DS
B. Set ShowStartSearchBand = 0
2. Search Including Files Without Extensions
A. Regedit > HKEY_LOCAL_MACHINE\SYSTEM\CurrentControlSet\Control\ContentIndex
B. Set FilterFilesWithUnknownExtensions = 1
J2ME: Eclipse Error Fixes
ERROR:
java.lang.UnsupportedClassVersionError: com/sun/tools/javac/Main (Unsupported major.minor version 49.0)
SOLUTION:
ERROR:
Errors running builder 'Preverification' on project 'XXXXXXXX' init init
SOLUTION:
java.lang.UnsupportedClassVersionError: com/sun/tools/javac/Main (Unsupported major.minor version 49.0)
SOLUTION:
- Window > Preferences > Ant > Runtime > Ant Home... > Select C:/.../Ant directory
- Window > Preferences > Ant > Runtime > Global Entries > Add External JARs... > Select C:/.../JDK142/lib/tools.jar
ERROR:
Errors running builder 'Preverification' on project 'XXXXXXXX' init init
SOLUTION:
- Right Click Project > Properties > Java Build Path > Libraries tab > Add External JARS... > add CLDC1.1 stub from MPowerPlayer
- Right Click Project > Properties > Java Build Path > Libraries tab > Add External JARS... > add MIDP2.0 stub from MPowerPlayer
XP: Adding 'Command Prompt' to Context Menu
To bring up Context Menu right click in Windows Explorer
1. Open Regedit
2. HKEY_CLASSES_ROOT\*\shell\cprompt
@=Command Prompt
3. HKEY_CLASSES_ROOT\*\shell\cprompt\command
@=c:\windows\system32\cmd.exe
4. HKEY_CLASSES_ROOT\Directory\shell\cprompt
@=Command Prompt
5. HKEY_CLASSES_ROOT\Directory\shell\cprompt\command
@=c:\windows\system32\cmd.exe /k cd "%1"
The first part adds the command for all *.* files
The second part adds the command for all directories
JAVA: Quick and Safe Class Splitting
When a class is too large and you need to split it apart.. Best way is to utilize an inner-class, which will split A.class into A.class and A$B.class. Move all static methods of the outer class into the inner class.
For example:
class Outer {
private int var = 0;
private static void doSomething() { var = 10; /* large remaining chunk of code */ }
}
into:
class Outer {
private int var = 0;
private static doSomething() { Inner.doSomething(); }
static class Inner {
private static void doSomething() { var = 10; /* large remaining chunk of code */ }
}
}
NOTES:
1. Yes static inner classes are allowed. And is required in order to have the static inner method.
2. Yes static inner classes can successfully access the outer class' member variables without any tricks.
VI: Cool Tricks in VIM
Search For Text Beginning of Line
^\<word\>
Search For Multiple Words in a Line (remove spaces)
\( \<word1\> \| \<word2\> \)
Text Capture (search and replace sometext to sometextxt)
:%s#somete\(xt\)#somete\1\1#g
Replace only WHOLE WORDS (static & !statical)
:%s#\<static\>##g
Globally keep all lines containing the text "profile"
:g!/profile/d
Globally delete all lines containing the text "profile"
:g/profile/d
Globally delete all EMPTY lines in a file
:g/^$/d
Search for the word 'text' only at the end of a line
:text$
DOS: Commands (Continued)
1. Escape characters in DOS
Use ^
2. Write lines into a file in DOS (write new file)
Echo Text > text.txt
3. Write lines into a file in DOS (append to file)
Echo Text >> text.txt
MORE ------------------------------------------
In the following examples, we iterate a list of files and use the idiom ~[idiom] to extract certain part of a given filename.
Extract the filename without the extension : ~n
for %i in (*.*) do echo %~ni
Extract the file extension without the filename : ~x
for %i in (*.*) do echo %~xi
Extract the file attribute : ~a
for %i in (*.*) do echo %~ai
Extract the file time : ~t
for %i in (*.*) do echo %~ti
Extract the drive only : ~d
for %i in (*.*) do echo %~di
Extract the path only : ~p
for %i in (*.*) do echo %~pi
Extract the complete name : ~s
for %i in (*.*) do echo %~si
Extract the file length (in bytes) : ~z
for %i in (*.*) do echo %~zi
The path (with drive) where the script is : ~dp0
set BAT_HOME=%~dp0
echo %BAT_HOME%
cd %BAT_HOME%
The path (without drive) where the script is : ~p0
set BAT_HOME=%~p0
echo %BAT_HOME%
cd %BAT_HOME%
The drive where the script is : ~d0
set BAT_DRIVE=%~d0
echo %BAT_DRIVE%
The complete script name : ~s0
set BAT_PATH=%~s0
echo %BAT_PATH%
The script name only (as called with or without the extension): %0
set BAT_NAME=%0
echo %BAT_NAME%
BREW: Enabling Network for Simulator
To ENABLE, change the following:
delete this line
EVT_TAP 0
change to 0
ENCODING 1
delete this line
SOCKETS 1 0 0 0 1472
delete this line
EVT_TAP 0
change to 0
ENCODING 1
delete this line
SOCKETS 1 0 0 0 1472
C++: Array Initialization C++ vs Java
typical local declaration (with 3 ints allocated in memory)
int x[3] = {1,2,3};
typical local declaration 2 (with 3 ints allocated in memory)
int x[] = {1,2,3};
local declaration with no initial values (with 3 ints allocated in memory)
int x[3]; // ok, initial values undefined
initialization of only SOME values (with 3 ints allocated in memory)
int x[3] = {1}; // x[1] = x[2] = 0
specify size but and initialize the rest to 0 (with 100 chars allocated in memory)
char c[100] = "hi"; // size = 100, c[2-99] = 0
implicitly specify size (with 3 chars allocated in memory)
char c[] = "hi"; // size = 3
SVN: Installing Eclipse Subversion
Step 1: Install MYLAR (now MYLYN)
http://www.eclipse.org/mylyn/downloads/builds.php
Step 2: Install Buckminster
http://download.eclipse.org/technology/buckminster/3.2/updates
Step 3: Install Mylyn
http://download.eclipse.org/tools/mylyn/update/e3.2
Step 4: Install Eclipse SVN (subclipse)
http://subclipse.tigris.org/update_1.2.x
http://www.eclipse.org/mylyn/downloads/builds.php
Step 2: Install Buckminster
http://download.eclipse.org/technology/buckminster/3.2/updates
Step 3: Install Mylyn
http://download.eclipse.org/tools/mylyn/update/e3.2
Step 4: Install Eclipse SVN (subclipse)
http://subclipse.tigris.org/update_1.2.x
C++: Avoid Memory Fragmentation
Memory fragmentation means having free memory ("holes") between allocated and in-use memories that can't be used because that slot of memory is too small to fill with data. It is not technically a memory leak, but the memory is technically unusable during run-time.
It is believed C# automatically defrags memory so this would not occur.
Example of memory fragmentation:
for( cnt = 0; cnt < 10000; cnt+=3 )
{
// Allocate 30 bytes
m_memory[ cnt ] = new allocator (30 );
// Allocate 10 bytes
m_memory[ cnt + 1 ] = new allocator( 10 );
// Allocate 110 bytes
m_memory[ cnt + 2 ] = new allocator( 110 );
// De-allocate 10 bytes
m_memory[ cnt + 1 ] = null;
System.gc();
}
The 10 bytes deallocated is stuck between 30 and 110 bytes respectively, and is too small to be reused later on.
---- Memory looks like ----
=================
OCCUPIED 30 bytes
OCCUPIED
=================
LOST... 10 bytes
=================
OCCUPIED 110 bytes
OCCUPIED
OCCUPIED
OCCUPIED
OCCUPIED
OCCUPIED
OCCUPIED
=================
C++: Friends
Friends are external classes that is given permission to access private/protected members of this class.
---- Scenario 1: Friend functions ----
class apples{
private:
friend func();
};
class oranges{
void foo();
};
void oranges::foo() {
apples* a = new apples();
a->func(); // this is ok because func is a friend
}
---- Scenario 2: Friend classes ----
class apples{
friend class oranges;
private:
int value;
};
class oranges{
void foo();
};
void oranges::foo(){
apples* a = new apples();
a->value = 10; // this is ok because oranges is declared as a friend of apples
}
PHOTOSHOP: Key Shortcuts
Shift + [Key] = toggle command
A: Path Selection
B: Brush/Pencil
C: Crop
E: Erase
F: Full Screen Toggle
G: Paint
H: Hand
I: Eyedrop
J: Healing
K: Slice
L: Line
M: Cut
N: Notes
O: Dodge
P: Pen Tool
Q: Quick Mask
R: Blur/Sharpen
S: Clone
T: Text
U: Shapes
V: Move Tool
W: Wand
X: Swap Color Palettes
Y: History
Z: Magnify
A: Path Selection
B: Brush/Pencil
C: Crop
E: Erase
F: Full Screen Toggle
G: Paint
H: Hand
I: Eyedrop
J: Healing
K: Slice
L: Line
M: Cut
N: Notes
O: Dodge
P: Pen Tool
Q: Quick Mask
R: Blur/Sharpen
S: Clone
T: Text
U: Shapes
V: Move Tool
W: Wand
X: Swap Color Palettes
Y: History
Z: Magnify
C++: Virtual Destructor
Works in the same way as virtual functions, used only when you want to specify which destructor you want to call.
---- Scenario 1 ----
class Parent{
~Parent();
};
class Child : public Parent{
~Child();
};
Parent* kid1 = new Child;
Child* kid2 = new Child;
delete kid1; // calls parent destructor because Parent.~Parent is not virtual
delete kid2; // calls parent destructor followed by child destructor (usual behavior)
---- Scenario 2 ----
class Parent{
virtual ~Parent();
};
class Child : public Parent{
~Child();
};
Parent* kid1 = new Child;
Child* kid2 = new Child;
delete kid1; // calls child destructor because Parent.~Parent is virtual
delete kid2; // calls parent destructor followed by child destructor (usual behavior)
C++: Pure Virtual Functions
- Pure virtual functions are REQUIRED to be implemented by a child class.
- Classes containing pure virtual functions cannot be instantiated.
- To use that class a deriving class must eventually implement all pure virtual functions.
- Similar to java abstract classes.
C++: Virtual Functions
---- Scenario 1 ----
class Parent {
public:
int foo(); // <-- called if Parent.foo is not virtual
};
class Child : public Parent {
public:
int foo(); // <-- called if Parent.foo is virtual
};
Child kid;
(Parent) kid.foo(); // calls PARENT version, because Parent.foo is not virtual
---- Scenario 2 ----
class Parent {
public:
virtual int foo();
};
class Child : public Parent {
public:
int foo();
};
Child kid;
(Parent) kid.foo(); // calls CHILD version, because Parent.foo is virtual
class Parent {
public:
int foo(); // <-- called if Parent.foo is not virtual
};
class Child : public Parent {
public:
int foo(); // <-- called if Parent.foo is virtual
};
Child kid;
(Parent) kid.foo(); // calls PARENT version, because Parent.foo is not virtual
---- Scenario 2 ----
class Parent {
public:
virtual int foo();
};
class Child : public Parent {
public:
int foo();
};
Child kid;
(Parent) kid.foo(); // calls CHILD version, because Parent.foo is virtual
SVN: Externals
1. Right-click on any versioned directory
2. TortoiseSVN > Properties
3. Add...
Commit the changes. Done!
2. TortoiseSVN > Properties
3. Add...
A. Property name: svn:externals
B. Property value: [DEST:sub-directory] [SRC:svn-location-URL]
ie. res_ext svn://xxx.xxx.xxx.xxx/software/res
B. Property value: [DEST:sub-directory] [SRC:svn-location-URL]
ie. res_ext svn://xxx.xxx.xxx.xxx/software/res
Commit the changes. Done!
BREW: ImageMagick Command PNG->BMP
(Install ImageMagick)
for %%i in (*.png) do call convert -background "#ff00ff" %%i -flatten %%i.bmp
Using BMP palettes instead of 24bit color:
for %%i in (*.png) do call convert -background "#ff00ff" %%i -flatten -type "Palette" +matte -colors 256 BMP2:%%i.bmp
for %%i in (*.png) do call convert -background "#ff00ff" %%i -flatten %%i.bmp
Using BMP palettes instead of 24bit color:
for %%i in (*.png) do call convert -background "#ff00ff" %%i -flatten -type "Palette" +matte -colors 256 BMP2:%%i.bmp
C++: Memory Allocation
class A {
int i;
class B {
char c[1024];
};
};
When we call "A* myA = new A()" the memory looks like this:
- 4 bytes in heap allocated, B was instantiated/allocated
When we call "A myA = A()", the memory looks like this:
- 4 bytes in stack allocated, B was instantiated/allocated
class A {
int i;
class B {
char c[1024];
} myB;
// the same as
// B myB;
};
When we call "A* myA = new A()" the memory looks like this:
- 4 + 1024 bytes in heap allocated, B was instantiated/allocated
When we call "A myA = A()", the memory looks like this:
- 4 + 1024 bytes in stack allocated, B was instantiated/allocated
int i;
class B {
char c[1024];
};
};
When we call "A* myA = new A()" the memory looks like this:
- 4 bytes in heap allocated, B was instantiated/allocated
When we call "A myA = A()", the memory looks like this:
- 4 bytes in stack allocated, B was instantiated/allocated
class A {
int i;
class B {
char c[1024];
} myB;
// the same as
// B myB;
};
When we call "A* myA = new A()" the memory looks like this:
- 4 + 1024 bytes in heap allocated, B was instantiated/allocated
When we call "A myA = A()", the memory looks like this:
- 4 + 1024 bytes in stack allocated, B was instantiated/allocated
BREW: Trouble-shooting
"ClassName" : No appropriate default constructor available
Scenario:
Parent: parentConstructor(int x, int y);
Child: childConstructor(int x, int y, int z);
Fix:
Parent: parentConstructor(int x, int y);
Child: childConstructor(int x, int y, int z) : parentConstructor(x, y);
Reason:
This will force the childConstructor to use specifically use parentConstructor(x, y), instead of looking for parentConstructor(x, y, z).
DOS: Recursive set command
Sample recursion to set one environment variable to a collection of text:
set COLLECTION=
setlocal ENABLEDELAYEDEXPANSION
for %%i in (a b c d e) do ( set COLLECTION=!COLLECTION! %%i.cpp )
:: result, COLLECTION=a.cpp b.cpp c.cpp d.cpp e.cpp
echo %COLLECTION%
set COLLECTION=
setlocal ENABLEDELAYEDEXPANSION
for %%i in (a b c d e) do ( set COLLECTION=!COLLECTION! %%i.cpp )
:: result, COLLECTION=a.cpp b.cpp c.cpp d.cpp e.cpp
echo %COLLECTION%
C++: Preprocessing Messaging
This will print the message "Compiling against Brew SDK v1.1" whenever AEE_SIMULATOR is defined.
#if AEE_SIMULATOR
#pragma message( "Compiling against Brew SDK v1.1" )
#endif
#if AEE_SIMULATOR
#pragma message( "Compiling against Brew SDK v1.1" )
#endif
BREW: Batch compile MIF file
In order to DYNAMICALLY insert values into the MIF, you must have .dtd files with the appropriate properties. You then import its properties using the MFX file.
Sample DTD file (cid.dtd)
<!ENTITY APPLICATION_CLASSID "0x00ABCDEF">
Another Sample DTD file (ver.dtd)
<!ENTITY APPLICATION_VERSION "1.0.0">
Sample MFX file
<?XML version="1.0" encoding="utf-8"?>
<!DOCTYPE BREWRes
[
<!ENTITY % version_dtd SYSTEM "ver.dtd">
<!ENTITY % classid_dtd SYSTEM "cid.dtd">
%version_dtd;
%classid_dtd;
]>
... some mfx stuff here
<String Id="8" Name="IDS_STRING_8">
... more mfx stuff here
<Applet BaseId="1000" CLSID="&APPLICATION_CLASSID;">
... more mfx stuff here
Finally, to put it all together, just make sure the MFX file can find the *.dtd files, and then call this in command prompt:
brewrc.exe -o output.mif -nh input.mfx
And you're done.
Sample DTD file (cid.dtd)
<!ENTITY APPLICATION_CLASSID "0x00ABCDEF">
Another Sample DTD file (ver.dtd)
<!ENTITY APPLICATION_VERSION "1.0.0">
Sample MFX file
<?XML version="1.0" encoding="utf-8"?>
<!DOCTYPE BREWRes
[
<!ENTITY % version_dtd SYSTEM "ver.dtd">
<!ENTITY % classid_dtd SYSTEM "cid.dtd">
%version_dtd;
%classid_dtd;
]>
... some mfx stuff here
<String Id="8" Name="IDS_STRING_8">
<Text>&APPLICATION_VERSION;</Text>
</String>... more mfx stuff here
<Applet BaseId="1000" CLSID="&APPLICATION_CLASSID;">
... more mfx stuff here
Finally, to put it all together, just make sure the MFX file can find the *.dtd files, and then call this in command prompt:
brewrc.exe -o output.mif -nh input.mfx
And you're done.
TRAC: Subdomain access
Step 1: Edit C:/Windows/System32/drivers/etc/hosts file by adding:
127.0.0.4 trac.localhost
Step 2: Edit C:/Konami/Web/Apache/conf/extra/httpd-vhosts.conf by adding:
<VirtualHost 127.0.0.4>
DocumentRoot "C:/Konami/Web/Apache/htdocs/trac"
ServerName trac.localhost.com
ServerAlias www.trac.localhost.com
</VirtualHost>
Step 3: Run trac service by using the following command:
bash -c 'C:/Konami/Python/Scripts/tracd
Now you should be able to access the trac server by entering 'trac.localhost' into your browser.
127.0.0.4 trac.localhost
Step 2: Edit C:/Konami/Web/Apache/conf/extra/httpd-vhosts.conf by adding:
<VirtualHost 127.0.0.4>
DocumentRoot "C:/Konami/Web/Apache/htdocs/trac"
ServerName trac.localhost.com
ServerAlias www.trac.localhost.com
</VirtualHost>
Step 3: Run trac service by using the following command:
bash -c 'C:/Konami/Python/Scripts/tracd
--hostname="trac.localhost"
--port=80
"C:/Konami/Web/Apache/htdocs/trac"'
--port=80
"C:/Konami/Web/Apache/htdocs/trac"'
Now you should be able to access the trac server by entering 'trac.localhost' into your browser.
TRAC: Trouble-shooting
1. "UnicodeDecodeError: 'ascii' codec can't decode byte 0xe2 in position "
Look in: C:\Konami\Python\share\trac\wiki-default for 0xe2
Replace all instances of 0xe2 with "
2. POST does not return users to the correct URL because it's missing the base-url
Look in: C:\Konami\Web\Apache\htdocs\trac\conf\trac.ini
base_url = http://trac.localhost/trac/
3. The 'repository_dir' has changed, a 'trac-admin resync' operation is needed.
./trac-admin "C:/Konami/Web/Apache/htdocs/trac" resync
BREW: Sample BREW batch file
In MAKE_XXX.bat
set GAME_DEFINES=-Ddefine1 -Ddefine2 -Ddefine3
call build_brew.bat contra LG_VX7000 BREW2
In build_brew.bat
set GAME_NAME=%1
set GAME_BUILD=%2
if("%3"=="BREW1) set BREW_SDK=lib\1.1.0
if("%3"=="BREW2) set BREW_SDK=lib\2.1.3
if("%3"=="BREW3) set BREW_SDK=lib\3.1.5
set BUILD_SOURCE=.\src
set BUILD_DEFINES=-DDYNAMIC_APP %GAME_DEFINES%
set BUILD_INCLUDES=-I%BUILD_SOURCE% -I%BREW_SDK%\inc
set BUILD_FLAGS=-cpu ARM7TDMI -apcs/ropi/interwork -littleend -zas1 -zas4 -fa -g -Ospace -O2 -Wy -c
set COMPILE_ARGS=%BUILD_DEFINES% %BUILD_INCLUDES% %BUILD_FLAGS% -w
:: for each .cpp to compile
tcpp %COMPILE_ARGS% -oFILENAME.o -oDIR\TO\FILENAME.cpp
tcpp ...
armlink -o %GAME_NAME%.elf -ropi "%BREW_SDK%\compiled\AEEAppGen.o" "%BREW_SDK%\compiled\AEEModGen.o" FILENAME.o FILENAME1.o ... -first AEEMod_Load -map -list out.map -split -reloc
elf2mod %GAME_NAME%.elf %GAME_NAME%.mod
WEB: How to create htdigest auth files
Apparently this is the more basic login authentication version of .htpassword. Creation can be done in 2 ways:
#1. using Apache:
A. Open command prompt and goto \Apache\bin
B. htdigest -c trac.htdigest trac.localhost dyu (htdigest [filename] [realm] [username])
C. To add more users to the same digest file: do not use the -c option.
#2. using Python:
A. Paste the following into htdigest.py
from optparse import OptionParser
import md5
usage = "usage: %prog [options]"
parser = OptionParser(usage=usage)
parser.add_option("-u", "--username",action="store", dest="username", type = "string",
help="the username for whom to generate a password")
parser.add_option("-p", "--password",action="store", dest="password", type = "string",
help="the password to use")
(options, args) = parser.parse_args()
if (options.username is None) or (options.password is None):
parser.error("You must supply both the username and password")
realm = 'trac'
kd = lambda x: md5.md5(':'.join(x)).hexdigest()
print ':'.join((options.username, realm, kd([options.username, realm, options.password])))
B. python.exe htdigest.py -u dyu -p 123456 >> C:\trac.htdigest
BREW: Notes on Brew
Apparently Visual Studios .NET 2005 does not like it when you pass in an enumeration as a parameter.
warning C4482: nonstandard extension used: enum 'MIDlet::CRITICAL_GAME_STATE' used in qualified name
The offending code would look something like this:
enum GAME_STATE
{
void func(GAME_STATE gs);
void class::func(GAME_STATE gs) { }
Instead it would be wiser to manually convert the code into int, like so:
public:
void func(int gs);
void class::func(int gs) { }
warning C4482: nonstandard extension used: enum 'MIDlet::CRITICAL_GAME_STATE' used in qualified name
The offending code would look something like this:
enum GAME_STATE
{
STATE_ON,
STATE_OFF,
};STATE_OFF,
void func(GAME_STATE gs);
void class::func(GAME_STATE gs) { }
Instead it would be wiser to manually convert the code into int, like so:
public:
const static int STATE_ON=0;
const static int STATE_OFF=1;
const static int STATE_OFF=1;
void func(int gs);
void class::func(int gs) { }
DOS: Run Unix Commands
In DOS type:
C:\some\random\dir> bash -c 'unixCommand unixCommandParam'
ie. bash -c '/usr/bin/python setup.py install'
The reverse of running DOS commands from Unix can be done by the following:
$ cygstart winCommand 'winCommandParam1' 'winCommandParam2' ... etc
ie. cygstart build.bat LG_VX7000 SMALL
C:\some\random\dir> bash -c 'unixCommand unixCommandParam'
ie. bash -c '/usr/bin/python setup.py install'
The reverse of running DOS commands from Unix can be done by the following:
$ cygstart winCommand 'winCommandParam1' 'winCommandParam2' ... etc
ie. cygstart build.bat LG_VX7000 SMALL
TRAC: Installing Trac the Hard Way
Verdict: Don't bother trying to install Trac with Python 2.5... it's better to use Python 2.4.
Step 1: Download the following files:
Step 2: Install SVN Python 1.4.4 (svn-python-1.4.4.win32-py2.4.exe). Installer will determine installation directory.
Step 3: Install ClearSilver 0.9.14 (clearsilver-0.9.14.win32-py2.4.exe). Installer will determine installation directory.
Step 4: Install MySQL Python 1.2.2 (MySQL-python-1.2.2.win32-py2.4.exe). Installer will determine installation directory.
Step 5: Install Trac 0.10.4 (trac-0.10.4.win32.exe). Installer will determine installation directory.
Step 6. Alter the 1st line in:
Step 7: open mysql
Step 8: create database `trac` default character set utf8 collate utf8_bin;
Step 9: open cygwin
Step 10: cd "C:\Konami\Python\scripts"
Step 11: mkdir "C:\Konami\Web\Apache\htdocs\trac"
Step 12: ./trac-admin "C:\Konami\Web\Apache\htdocs\trac" initenv
Step 13: ./tracd --port 8000 "C:/Konami/Web/Apache/htdocs/trac"
Step 14: Open Firefox, goto http://localhost:8000/trac
EDIT (ADDITIONAL STEPS)
Step 15: Install SVN: TortoiseSVN-1.4.4.9706-win32-svn-1.4.4.msi
Step 16: Create repository in "C:/Konami/Web/Apache/htdocs/svn"
Step 18: Create svn.auth for svn authentication
Step 1: Download the following files:
A. clearsilver-0.9.14.win32-py2.4.exe
B. MySQL-python-1.2.2.win32-py2.4.exe
C. python-2.4.4.msi
D. svn-python-1.4.4.win32-py2.4.exe
E. trac-0.10.4.win32.exe
Step 1: Install Python 2.4 (python-2.4.4.msi) to C:\Konami\PythonB. MySQL-python-1.2.2.win32-py2.4.exe
C. python-2.4.4.msi
D. svn-python-1.4.4.win32-py2.4.exe
E. trac-0.10.4.win32.exe
Step 2: Install SVN Python 1.4.4 (svn-python-1.4.4.win32-py2.4.exe). Installer will determine installation directory.
Step 3: Install ClearSilver 0.9.14 (clearsilver-0.9.14.win32-py2.4.exe). Installer will determine installation directory.
Step 4: Install MySQL Python 1.2.2 (MySQL-python-1.2.2.win32-py2.4.exe). Installer will determine installation directory.
Step 5: Install Trac 0.10.4 (trac-0.10.4.win32.exe). Installer will determine installation directory.
Step 6. Alter the 1st line in:
C:\Konami\Python\Scripts\trac-admin
C:\Konami\Python\Scripts\tracd
to:C:\Konami\Python\Scripts\tracd
C:\Konami\Python\python.exe
Step 7: open mysql
Step 8: create database `trac` default character set utf8 collate utf8_bin;
Step 9: open cygwin
Step 10: cd "C:\Konami\Python\scripts"
Step 11: mkdir "C:\Konami\Web\Apache\htdocs\trac"
Step 12: ./trac-admin "C:\Konami\Web\Apache\htdocs\trac" initenv
A. Local SVN
B. mysql://root:123456@localhost:3306/trac
C. svn
D. C:/Konami/Web/Apache/htdocs/svn
E. C:/Konami/Python/share/trac/templates
B. mysql://root:123456@localhost:3306/trac
C. svn
D. C:/Konami/Web/Apache/htdocs/svn
E. C:/Konami/Python/share/trac/templates
Step 13: ./tracd --port 8000 "C:/Konami/Web/Apache/htdocs/trac"
Step 14: Open Firefox, goto http://localhost:8000/trac
EDIT (ADDITIONAL STEPS)
Step 15: Install SVN: TortoiseSVN-1.4.4.9706-win32-svn-1.4.4.msi
Step 16: Create repository in "C:/Konami/Web/Apache/htdocs/svn"
A. Manually create folder /svn
B. Right click INSIDE the folder
C. Tortoise SVN > Create repository here...
Step 17: Copy trac.ini into "C:/Konami/Web/Apache/htdocs/trac/conf"B. Right click INSIDE the folder
C. Tortoise SVN > Create repository here...
Step 18: Create svn.auth for svn authentication
A. Goto Web\Apache\bin
B. htpasswd -c C:\Konami\Web\Apache\conf\svn.auth dyu
C. Enter password x 2
D. Add the following line to "C:\WINDOWS\system32\drivers\etc\hosts"
B. htpasswd -c C:\Konami\Web\Apache\conf\svn.auth dyu
C. Enter password x 2
D. Add the following line to "C:\WINDOWS\system32\drivers\etc\hosts"
127.0.0.2 svn.localhost
E. Add the following to "C:\Konami\Web\Apache\conf\extra\httpd-vhosts.conf
<VirtualHost 127.0.0.2>
DocumentRoot "C:/Konami/Web/Apache/htdocs/svn"
ServerName svn.localhost.com
ServerAlias www.svn.localhost.com
<Location />
DAV svn
SVNPath "C:/Konami/Web/Apache/htdocs/svn"
AuthType Basic
AuthName "Subversion Repository"
AuthUserFile "C:\Konami\Web\Apache\conf\svn.auth"
Require valid-user
</Location>
</VirtualHost>
Subscribe to:
Posts (Atom)